Taking a screenshot in the latest game isn’t difficult. With today’s consoles, it’s literally as simple as pressing a button. Taking a great screenshot is an entirely different challenge altogether. Oftentimes a game’s art style, character work and environmental scope are so beautiful to behold that I find myself spending hours taking screenshot after screenshot — adjusting, tweaking, and angling to find the perfect composition. While the style and genre of a game play major roles in an image looking good, capturing a memorable moment comes with practice and an eye for scenario, subject matter and intrigue.
I’ve spent decades playing video games, and only with the rollout of the current generation of systems and their emphasis on social sharing have I felt the urge to be creative and seek out well-composed screenshots of all varieties. Over the last several years, I have been asked time and again about the matter, and I decided to break down the things I personally look for in “the perfect screenshot.”
To that end, I’ve compiled a set of steps that I follow. These steps are more like “guidelines” and though I strive to implement them in my screenshots, there are admittedly times when I can’t. Now, video game “photography” is similar to real-life photography but bound by some of the limitations of each game’s “photo mode” or other aspects of hardware. With the right amount of perseverance, you’ll be pulling off beautiful shots in no time. These are the general rules of thumb that I follow.
- The Rule of Thirds
- Point(s) of Interest
- Asymmetry
- Color
- Creation of Movement
- Light and Dark
- Lines and Curves
- Viewpoint (positioning)
- Simplicity
The Rule of Thirds
One of the most frequent principles I use when capturing screenshots is commonly referred to as the “rule of thirds” in art. This guideline suggests an image be divided up into nine equal sections by two horizontal and vertical lines spaced out equally and that important elements be placed along these lines or near their intersections. The idea behind this is that aligning a character, object, or subject around these points generates interest, curiosity, and energy in the composition of the image rather than simply sticking the subject in the middle (see the example below).

A nature shot, demonstrating the Rule of Thirds (Courtesy of Wikipedia)
To further exemplify the rule of thirds, here are three screenshots I took: one from the amazing Uncharted: The Lost Legacy, the incredibly fun Far Cry New Dawn, and lastly the masterpiece that is God of War. In the first, you’ll notice that I positioned Chloe and a large section of the train in the left portion of the image (the left “third”), immediately pulling your eyes there. As your eyes follow along and shift from the left to the right side of the picture, you’ll notice the waterfall in the background and a sort of horizon line where the train tracks lead between the mountains. These make up the middle to upper right side of the image, namely in an intersectional point. This screenshot is a typical example of the rule of thirds. By sticking those certain bits and pieces of the picture where they are, we can create an interesting composition that tells a story on its own.

Similarly, I angled the Far Cry screen below to ensure a large portion of the bus is towards the right third, along with the tree in the foreground. I took the viewer’s point of view into account by positioning the camera to show a longer, wider shot of the bus that flows into the deeper sections of the screenshot. While most of the right third is taken up by the bus and tree, the left-most portion is kept a bit emptier with lots of negative space (the sky). This is a more pleasing image over a more head-on shot thanks to the rule of thirds.

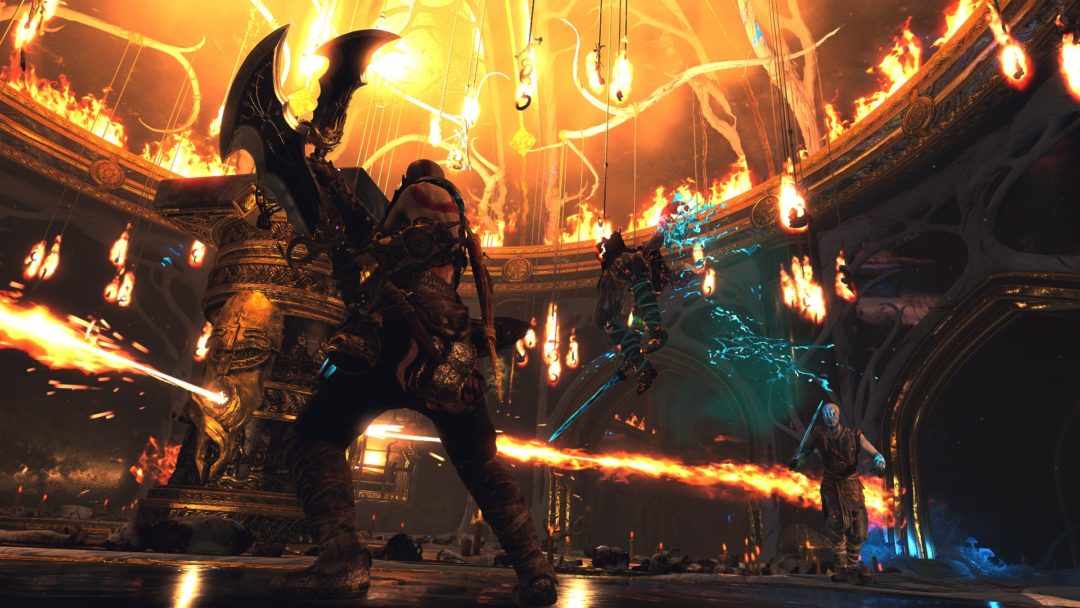
This God of War shot is another good example. While Kratos is mostly centered, I positioned the camera so that he sits along intersections. Likewise, I made sure the gate mostly resided in the upper left areas of the image rather than sticking it directly in the center.

Let’s take a look at each through the lens of the rule of the thirds. Do you notice the placement of subjects and points of interest around intersections and horizontal/vertical planes?


Point(s) of Interest
Another important yet seemingly overlooked aspect to great screenshots is ensuring you have at least one point of interest in your capture. Having two or three is perfectly acceptable, but remember that the more points of interest you have in an image, the more they compete for the viewer’s attention.
Have a look at the two examples here from Red Dead Redemption II and Anthem. The first thing your eyes will drift towards in Red Dead II is, well, the inn smacking you right in the face! I deliberately placed the camera here to bring attention to the building and allowed the angle of the street (continuing onwards towards nature), sidewalks, and power lines to portray the illusion of a more interesting town at large. This creates more dynamic influence versus a head-on static shot. The contrast between the lighter values of the left versus dark on the right also highlights a more aesthetically interesting picture.

We see a similar situation with this screenshot of Anthem. Here, the first thing your eyes focus on is the bright opening through the trees, allowing beautiful shafts of light to penetrate the canopy. You’ll notice this area is off-center. Going back to the rule of thirds, you generally don’t want to center a point of interest. As you pan over the bright light, your eyes begin to veer leftward onto the large statues, again in the left third of the screenshot. Falling leaves and foreground ruins bring out an additional bonus: an illusion of movement and intrigue!

Dig a little deeper into each. Click to enlarge.

Symmetry vs. Asymmetry
All photos fall into one of two forms: symmetrical or asymmetrical. As seen in the example below, symmetrical balance occurs when both sides of an image are basically identical if you draw a bisecting middle line. In essence, symmetrical balance usually conveys a sense of order and logic to things. While this has its place in art and photography, most examples I see tend to feel a little muted and, well, boring. It’s in screenshots with asymmetrical balance that you see a larger sense of liveliness and variety.

Example courtesy of Sophia.org
Here are a few images I took from the recent Darksiders III, our pal Far Cry New Dawn again, and of course the amazing Spider-Man from Insomniac Games. In the Darksiders III screen, notice the difference between the left, right, top, and bottom sides. If you draw a line down the middle horizontally or vertically, you’d see there’s nothing symmetrical about this shot, yet it instills a sense of balance between the lighter upper-left portion and darker lower-right portion.

Here, back in Far Cry New Dawn, we see a similar setup. Light penetrates the ship hangar in the left background, illuminating a stage and all the objects surrounding it. In the right foreground, the fighter jet sticks out a bit, partially obscured by the darker lighting. The contrast and asymmetry of the image is striking, portraying balance and imbalance simultaneously. Pretty neat!

This is a capture of Spider-Man that I personally adore, namely for the wonderful asymmetrical balance. The numerous trees, street lights, bus stops, and hustle and bustle of the traffic on the roads are perfectly balanced by the openness of the river and dusk sky. Of course, Spider-Man is strategically positioned in the right third of the image along an intersection point.

Look further to see how I’ve broken them down. Click to enlarge.


Color
The use of color is fairly self-explanatory. Generally speaking, the more colorful a screenshot is, the more pleasing it is to look at. A screenshot of a nature-scape filled with wild flowers, snowy mountains, green fields, and blue streams is more captivating than that of a dark and dirty alleyway or cityscape. Usually. There are three properties to color: hue, value, and chroma. Hue is simply the shade of color (blue, green, red, etc). Value refers to brightness or darkness of said color, while chroma refers to its intensity and power. I always try to take color into consideration wherever possible when capturing images unless a specific scene is better served with less variety in tones. Color is a powerful tool when it comes to affecting the human mood.
In general, try to implement colors in smart locations to evoke the tone you’re going for.

In the God of War shot above, the chroma of the blue is obvious. Its overwhelming presence and intensity in the image creates a sense of wonder and mystery, while overpowering the subject, Kratos. It contrasts beautifully against the darkness of the rest of the screenshot.

This shot of Marvel’s Spider-Man has many different colors and values going on. The high values of the wall tiles, metal surface of the stove fan, and orange glow from the outside light combined with the low values of the cabinets, doorway, and shadow of the mid-section create a wonderful balance. The reflectiveness of the mid-section is a nice bonus.

This screenshot of Far Cry New Dawn is a classic example of a multitude of natural colors coming together to form a gorgeous picture. The rule of thirds places Joseph Seed (the subject) and the brown dirt trail on the bottom left. As your eyes move across the image, the green of the bushes and blue of the stream form the midpoint until the intense pink of the tree rounds out the upper right section.
A Feeling of Movement
This might seem a bit obvious, but the illusion of motion brings out a more fun and exciting aspect to a picture than something static.
Here is one of my personal favorite screenshots I took of Journey. The artistic beauty behind the game already does most of the work, but there’s also beauty in capturing a great moment. This spot stuck out to me, and the feeling of movement is a significant part of that. Rather than the hills and stone markers all being the same size, each is unique, with some larger than others. You can see the different markers placed closer to and farther from the horizon. The same can be said of the hills, each sloping and guiding the eye to move from one to the other, culminating in the larger mountain all the way in the back.

This is also an example of multiple points of interest coming together harmonically, as is the case with much of the rest of game! There are three main points of interest here: the wanderer (player character), the ruins, and the mountain. Let’s analyze it a little more below. Click to enlarge.

The Dark Side… and the Light
One of the simplest and most effective ways of generating a provocative mood and sparking viewer intrigue is to portray a balance of high values (light) and low values (darkness). The overall effect is one of atmospheric liveliness. I turned to two of my favorite games of this generation: The Witcher 3 and Batman: Arkham Knight. Gotham City is drenched in the neon glow of street signs and billboards illuminating the dark depths of its underworld.
The Ranelagh Ferry Terminal was a perfect location to showcase value balance. I positioned Batman on an adjacent roof to the terminal with a higher camera. Not only does this highlight a nice touch of asymmetrical balance, but it casts Batman in a dominating position (we’ll get to position later). The black of Batman’s suit is in beautiful contrast to the ferry terminal’s orange neon glow. The darkness of the surrounding water creates a nice effect of negative space, bringing the viewer’s eyes to focus on the bottom left two-thirds of the screenshot.

The Witcher 3 is another fantastic example of wonderful usage of light and darkness. Notice the gorgeous picture below, dividing the image almost diagonally into high value and low value, with a few sources of low penetrating the high (the bush on the left and tower on the right). This distinction between the lighter values of the sky and clouds and the darker values of the ground and dirt creates a much more visually appealing capture. The positioning of Geralt and Roach is off-center, while the tower resides in the foreground in the upper-right third. The tower is the most obvious point of interest.

I love these two pictures for their beautiful contrast. A little breakdown of each you ask? Why I’d love to. Click to enlarge.


Lines and Curves
Both artificial and naturally occurring lines and curves can have a dramatic effect on the overall composition of an image. Lines contribute to an illusion of depth and oftentimes bring attention to a specific focal point for the viewer. Arranging subjects and objects along lines can direct a person to follow along the picture for the perception of movement. Landscape shots tend to invoke a sense of stillness and tranquility thanks in part to a naturally occurring horizontal line along the — you guessed it — horizon. Vertical lines imbue a sense of height and imposition.
Similarly, curves help to spice up screenshots. Generally, they’re more pleasing to the human eye, and that’s something most can probably attest to. Instead of the hard edges and formality of lines, curves impart malleability and a sense of softness. In these two shots of Spider-Man, take notice of the varying amounts of lines and curves.


Positioning
Among my favorite “guidelines” to keep in mind is the viewpoint or positioning of the subject(s) of each screenshot. Positioning plays a huge role in the viewer’s interpretation. You can place a human in a photograph and have him or her appear in many distinct ways. If he or she is photographed from above, their diminished stature is hard to ignore. Likewise, a photograph at eye level demonstrates a viewpoint of equality while taking a photo below the individual creates an impression of dominance. There are so many ways to alter perception simply through positioning!
Have a look at Kratos here in God of War. He is completely overshadowed by the giant tortoise Chaurli, with his head titled upwards in its direction. Likewise, the tortoise itself stares right back at him in a position of dominance and strength. This image is also exemplary of the rule of thirds, asymmetrical balance, and the creation of movement.

Two more classic examples of good positioning are seen here in Darksiders III and Shadow of the Colossus. In Darksiders III, we see Fury face off against one of the Seven Deadly Sins, Wrath. He’s a foreboding hulk of an adversary, which is clearly personified in this screenshot. Fury’s smaller stature relative to Wrath is obvious, with her position closer to the foreground and Wrath’s a bit further into the background. It’s a great example of altering the viewer’s perception to create a menacing impression.


In the screenshot right below that, Wander’s placement relative to the Colossus is pure diminished positioning. Though he appears similar in size in terms of total image surface area, he is absolutely dwarfed in reality. This example is also great at showcasing the contrast between light and dark.
Finally, highlighting a different viewpoint is Geralt of Rivia in this Witcher 3 shot. He takes up a very large portion of the screen in comparison to Syanna in the background, filling the frame with more drama and the perception that he’s metaphorically larger than he really is. A shallow depth of field effect is also cast on him, bringing forth some more attention on the other character as your eye moves from left to right. This shot has it all: asymmetrical balance between both sides, a contrast of high and low values, the rule of thirds, points of interest, and, of course, exceptional positioning.

Here are several more examples of smart positioning to affect the viewer’s perception of scale, action, and intent. Click to enlarge.


Simplicity
An overly crowded screenshot can oftentimes make it difficult for the viewer to identify a point of interest. Chaotic lighting and a bad placement of objects distract from the subjects you may be trying to bring attention to. Now, this isn’t always the case. You could be taking screens of a massive cityscape, town or village. Many times these locations have numerous structures. When done well, they can form mesmerizing landscapes. But simplification can also go a long way in bringing the immediate attention of the viewer to what you want them to focus on.
The simplicity in this shot of Metro Exodus below is clear. The destroyed Hind helicopter calls for your attention straight away, lying alone and destroyed in a desolate desert. There’s barely anything else in the picture, yet the serenity and purity of it is without doubt.


In the above shot of Days Gone, we see few objects take up the bulk of the screen. The forest in the background obviously make up a large part of the image, but it’s really only the two decaying vehicles on the left that serve as objects of interest. The muted tones instill mystery and danger. The sun’s light pierces the treetops while the vehicles call your attention, sitting mostly in-between the light rays as if a highlight.
Practice Makes Perfect
Ultimately, everyone becomes better at something with the most tried and true method there is: practice. When you visualize what you desire in an image, you become better attuned to realizing the end goal. There are many more tips and tricks to ensuring your screenshots come out great. Implementing depth of field in the right places can dramatically change the nature of a shot. Tilting an image can completely change its feeling of movement, dynamism and symmetrical balance. Smart utilization of space around or within an object has an underappreciated aesthetic effect, while simplicity over clutter goes a long way in crafting a visually pleasing picture.
Try to implement these guidelines into your screen captures the next time you’re playing. I guarantee you’ll become a screenshot master in no time!