
Now that you’re used to Ghostrunner 2‘s bike and it’s finicky, slippery controls it’s time to use it better explore the wasteland surrounding The Tower. Here’s how to find every collectible in Ghostrunner 2 Chapter 11, “Pillars of Creation.”
Ghostrunner 2’s Steel Horse
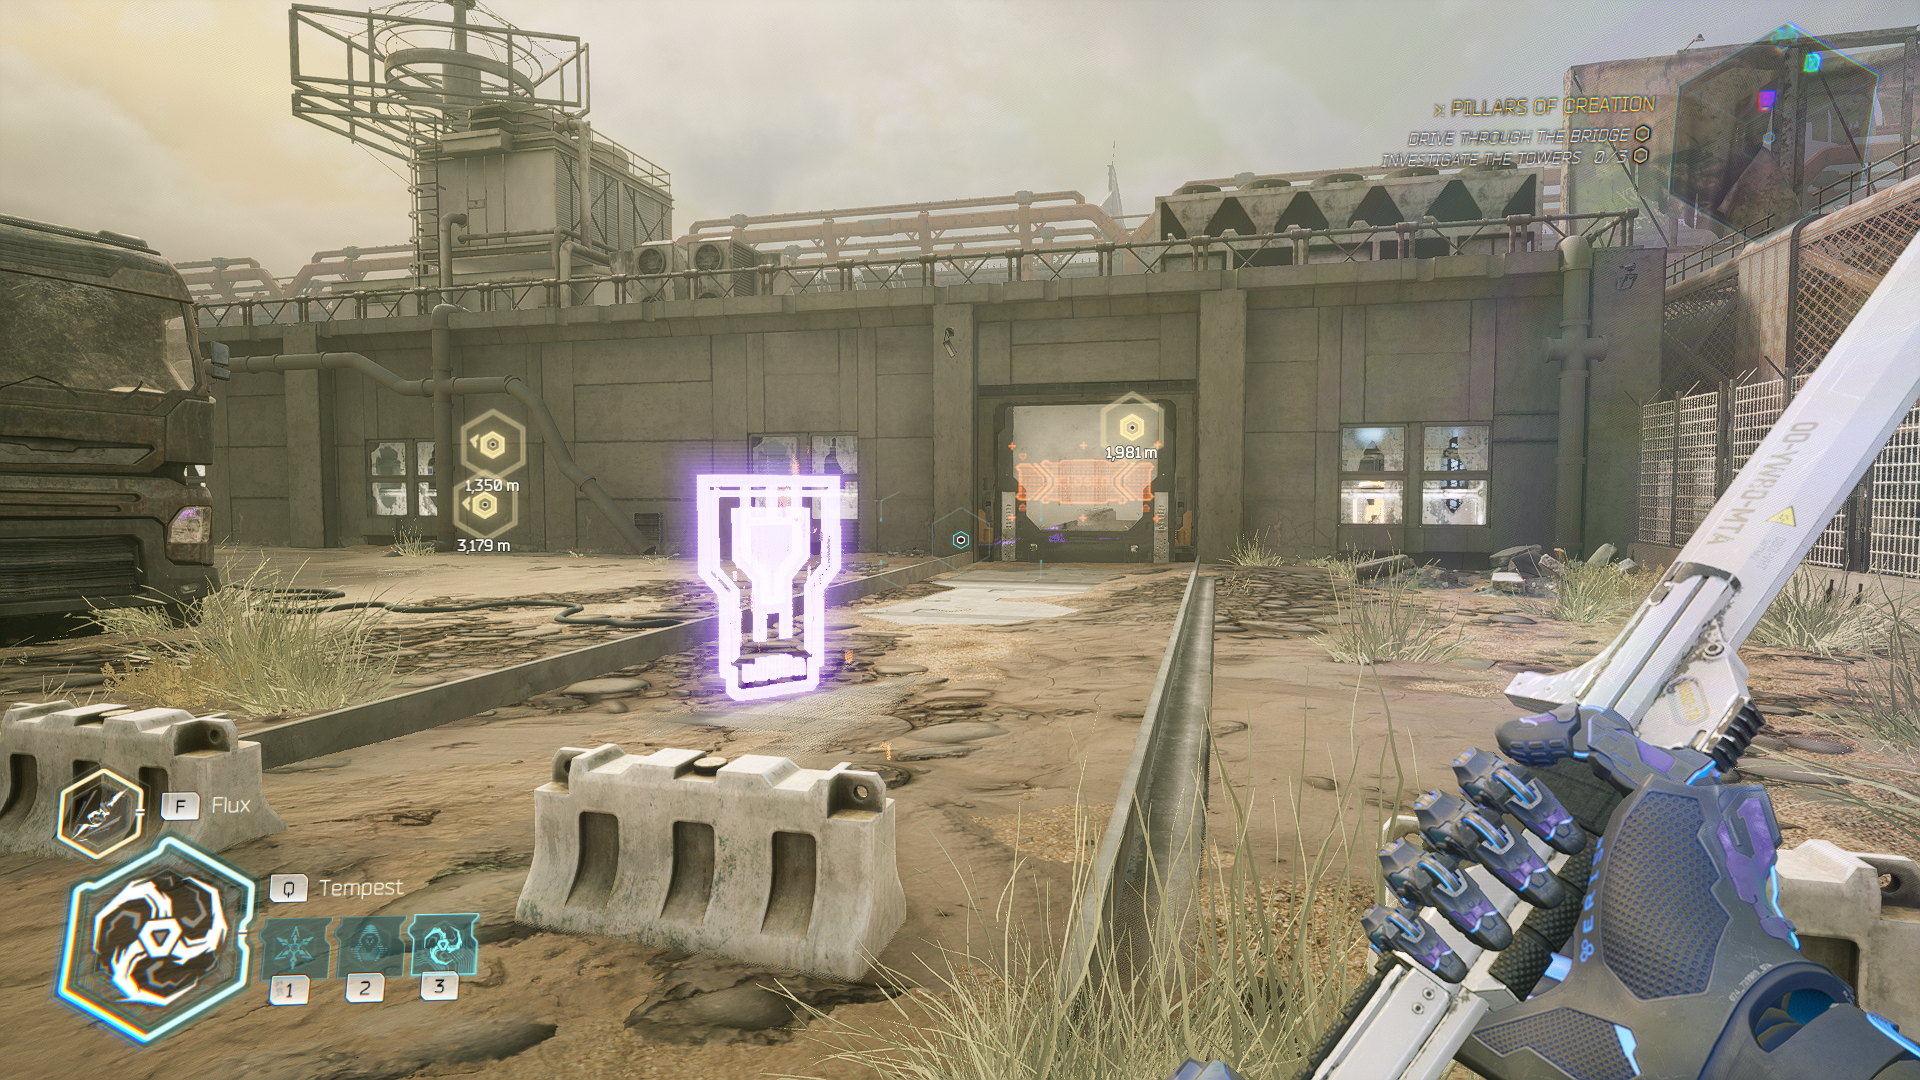
Chapter 11 is hands-down the most expansive level in Ghostrunner 2 both in terms of how it tasks players with completing its objectives and the general location you need to explore. Rolling into the Wasteland, Kira tells Jack that if he wants to follow Mitra’s signal, he’ll need to activate three separate consoles to clear out the blocked bridge that stands in his way. You can complete these individual quests in whatever order you want so the order you come across the collectibles in “Pillars of Creation” may very well be different to my playthrough. Regardless, most of the items you’re looking for can be found by paying close attention to the mini-map in the upper-right corner of the screen so don’t worry too much about uprooting the entire desert to find a single missing Memory Shard.
Related: Ghostrunner – Zero Punctuation
In total, there are 15 collectibles in Ghostrunner 2 Chapter 11. These consist of 11 Memory Shards, one Hidden Sword and three Artifacts. This is going to be a long one so strap onto your Cyberbike get ready to poke around the ruins of civilization.
Memory Shard #1
This one is easy enough and it’s difficult to miss. When you approach the first “CLOSED” gate that requires you shuriken down the container hanging to your right, you’re in the right place. Use the dropped crate to clamber onto the walls and dash into the arena. As you enter, you should see the Memory Shard floating on the other side.
Take out all the enemies and then proceed to the left side of the arena. You’ll find another crate that can be pushed around with Tempest. Firstly, look above it and you’ll find another shipping container. Use a shuriken to break the hook holding it up before using Tempest to push the first crate towards the Memory Shard. Now all you need to do is use the dropped container to leap onto the runnable wall you’ve created and jump onto the platform containing your prize.

Artifact #1
Now, this is where things get a little tougher to describe. Once you get off the bridge, you can go whatever way you want but for the sake of this guide, I’m starting with the objective marker on the left. Angle towards the aformentioned quest and you’ll see a ramp that’ll launch you towards one of the big mechanical tentacles bursted out of the ground. On the left of this monstrosity, you’ll see a collection of wrecked cars and a tunnel that’s been destroyed by rubble.
Head over to the cars and you’ll see this Artifact floating in the middle of the highway between what seem to be two cargo truck containers. When you pick it up, you’ll find that it’s… underwear? Given the surrounds, I’d say they may belong to Cyber Walter White.

Memory Shard #2
Back the highway leading up the hill to the left-most objective, keep following the road while sticking to the left. You’ll snake under several metal technicals but after a while, you’ll come across what looks like an abandoned gas station on the side of the road.
In front of the “CLOSED” door, you’ll see this Memory Shard floating in the parking lot, almost inviting you inside.
Artifact #2
If you listened to the unspoken invitation mentioned above, then proceed futher into the facility. There’ll be a single Wheel Zombie roaming around so bait it to drive into a wall and cut it down so you don’t have to watch your back constantly. Once its dead, move to the left side of the building and you’ll find a crate that can be pushed out of the way. Use Tempest to shove it aside and take your sword to the crumbling wall it was protecting.
Related: How to Make Constant Failure Fun in Video Games
Once you’re inside the building, you’ll encounter three Cyber Zombies that are easy enough to eliminate. You’ll find your Artifact waiting for you in the room which contained the enemies. An environmental suit! More evidence of Cyber Walter White…

Time Trail
In the same room wherein your found Artifact #2, you’ll find Ghostrunner 2 Chapter 11’s Time Trail challenge. It involves racing the bike through a series of rings. Net gold for some extra Data and two more Memory Shards. Honestly, I skipped it because I think the Cyberbike handles like tub of grease infused with oil.
Memory Shard #3
I admit, from here the actual flow of guide may get a little confusing but at the time, it just seemed to make sense. From the gas station, leap off the back of it and down the ledge overlooking the highway. Below you there’ll be a a building with a small parking lot to its right. Make a beeline for that structure.
One the otherside that’s facing the highway, you’ll find a Memory Shard floating alongside a machine that will allow you to purchase upgrades for Jack.

Memory Shard #4
From Memory Shard #3 in Ghostrunner 2 Chapter 11, go left to the destroyed skyscraper that’s right next door. On its right side, you’ll find a hole in the wall which will allow Jack to access the bottom floor. From here, you job is to make it upstairs by climbing through whatever holes you come across. You’ll want to look for any ledges that haven’t crumbled away and still retain a decent 90-degree angle on them; those can be mantled to reach the floor.
Keep soldier upwards, using the occassional wall-run-into-jump to clear some of the higher mantles and you’ll find this Memory Shard waiting patiently, just taking in the view.

Memory Shard #5
Right, now that we’ve had fun on our little detour, let’s get back on the highway leading to the left-most quest marker. Follow the highway, solving the occasional traversal puzzle or enemy encounter along the way.
When you make it through the tunnel section that’s been built into the side of the mountain, you’ll boost off a ramp and land just outside your primary objective. Get off your bike and instead of going straight, turn left and check out the building before you. There’ll be a shipping container dangling from a hook let a shuriken loose and bring it down. Use it to climb through an air vent, drop down into the structure itself and collect the Memory Shard inside.

Memory Shard #6
After you pick up Memory Shard #5 in Ghostrunner 2 Chapter 11, head back to the catwalk leading towards your main objective. Follow the path until you read the section where you’ll need to use Tempest to shunt a crate on rail across the sky. Drop down and use the hook attached to the aforementioned box to grapple over to the catwalk in front of you.
When you land, you’ll see a Skills Machine on the right. Turn a bit more to the right, and the Memory Shard will be looking straight back at you.

Memory Shard #7
As you begin actually climbing the tower, you’ll want to pause when you come across the first vertical wall held up by a breakable support beam. You know the ones, those bars with the big blue vial in the middle that can be smashed with a shuriken. Anyway, once you’re facing it turn around 180-degrees to look at the two runnable walls you used to make it onto the platform upon which you currently stand.
Leap back onto them and follow to a small grind rail connected to a platform that houses this Memory Shard. Alternatively, you could be like me and thought dropping down upon it from the level above was the better idea but really, it just took longer. After this collectible, there’s nothing more to find on this tower, so just focus on the enemies until you reach the terminal and the zipline that follows it.

Memory Shard #8
After the zipline from this first tower drops you back onto you Cyberbike, simply drive forward and over the ledge to land on a broken highway with a Memory Shard at the end. Gotta love a gimme.

Hidden Sword #1
This one took me a while to figure out both because it’s fairly well hidden and it’s a pain to reach. After collecting Memory Shard #8, drive off the highway and follow the road underneath a metal tentacle. You’ll eventually come across a fork in the road. Instead of going right or left, use the ramp to launch yourself over the rock in the middle. DON’T BOOST OVER IT.
You’ll want to try and stop on top of said rock and carefully drive over the edge onto a sandy platform just below you. It might be worth hopping off the bike to make sure you stick the landing.
Related: Is Steampunk Better Than Cyberpunk? – Slightly Civil War
Once you and your bike on on this outcrop, you’ll see a ramp to your left. Try and put as much distance between you and it before driving at full speed towards it, boosting as much as you can. As you fly off the edge, you’ll see a massive rusty pipe with a catwalk on top of it. Dismount in mid-air and soar on over to it. At the very end, you’ll find the Hidden Sword in Ghostrunner 2 Chapter 11.

Memory Shard #9
From the Hidden Sword, reunite with your bike and cruise on over the right-side of the highway. You’ll find this Memory Shard floating in the middle of a giant rusted cage that you’ll be able to drive straight through.

Artifact #3
From Memory Shard #9, I’m going to assume you took the ramp onto the highway and now find yourself embedded in the second tower. You’ll you’re in the right place if you find an arena battle that looks like “Shipment” in Modern Warefare: Just a bunch of shipping containers swarming with enemies.
Once you’ve killed all your foes in the aforementioned area, use a shuriken the contain hanging in the left corner to climb out of the arena. Proceed through the green door and turn right to drop yet another container. Use it to climb onto the ledge above but as you do, turn around and you’ll see two runnable walls alongside launching vents. Move through all of that and you’ll find yourself in a room with your Artifact. Survival Rations! Not completely a Breaking Bad reference, but it still fits, I guess. That’s it for this tower, so go ahead and complete it without the burden of discovery hanging over your head.

Memory Shard #10
Now that’ve finished up with the second terminal, you’ll be reunited with your Cyberbike. As you drive away, you’ll be presented with two tunnels. Take the one on the left and drive through it until you reach a section with an electrical wall and red lights on the ceiling. Hop off the bike and dunk into the room on your left through the doorway.
At the back left of this room is a cracked wall, so smash it and come face-to-face with two electrical barriers. They’ll blink on and off so you’ll need to time a dash perfectly to zip past both or, if you prefer playing it safe, just wait in the center until you can proceed. At the end of this section, you’ll see an electrical panel through a hole in the wall. Hit it with a shuriken and the BOOK IT back the way you came. If you’re fast enough, you’ll be able to enter the room that houses your Memory Shard.
Memory Shard #11
The last Memory Shard in Ghostrunner 2 Chapter 11 is also a bit of a gimme but given how much else you’ve done in this level, I think you’ve earned it. As you roll up to the third tower, you’ll encounter an arena with a crane in the middle holding up a metal panel alongside a crate. You’ll be able to drive through the catwalk and use the Cyberbike guns to eliminate the enemies on the ground if you so desire but your actual goal is above you.
Specifically, on the catwalk I just mentioned. Once everything is dead, leap onto the metal gangway and walk to the side with two shipping containers. The Memory Shard is tucked between them.

And that brings this collectibles guide for Ghostrunner 2 Chapter 11 to a close! Time for a break, I think. Well, that would be nice but if you play on, you’ll realize why that’s not possible…


Last Updated On: Oct 26, 2023 9:55 am CEST