Working as a journalist in Cyberpunk 2077 is always a risky business, but when you get mixed up with mercs, the job’s even more challenging. Here’s everything you need to know to complete “Shot By Both Sides” in Cyberpunk 2077: Phantom Liberty.
- Starting “Shot By Both Sides” in Cyberpunk 2077: Phantom Liberty
- Back to Dogtown
- Should You Save Bree or Not in Cyberpunk 2077: Phantom Liberty?
Starting “Shot By Both Sides” in Cyberpunk 2077: Phantom Liberty
To kick off this lengthy side-quest, players will need to have met a couple of prerequisites before they’re given the chance to pursue Bree and all her secrets. First, you’ll need to complete “The Damned” and “Get It Together,” two other quests introduced in the Phantom Liberty DLC. Once these have been wrapped up, V will receive a message from the fixer, Mr. Hands, who has a job involving a journalist named Bree. While he isn’t exactly forthcoming with the details, it sounds like she’s in trouble with a few corporations. Your task is to track her down and “look after her.”
Related: When Phantom Liberty Takes Place on the Cyberpunk 2077 Timeline
Your first goal is to head to her apartment in search of a Militech access card. Mr. Hands suggests that it’s hidden in her home, noting that V should keep their eyes peeled for a small bamboo tree. Underneath said plant, there’s a safe that contains the current goal. Before all that, simply follow the quest marker to reach the required location.
After reaching Bree’s abode, you’ll have to access it. Unfortunately, Mr. Hands hasn’t provided V with a key, so either hack it with Technical, or smash it open with Body. Either way, you’ll end up inside. Head over to the room on the right side of the apartment, and you’ll see the bamboo tree encased in a glass container illuminated by a red light. The safe is in the base, so go ahead and crack it open – no additional skills needed. Poor security, but let’s not look a gift safe in the mouth.
As you leave Bree’s apartment, her neighbor will knock on the door and ask if you know where she’s been hiding. Tell him whatever you want – it doesn’t really factor into the rest of the quest line. With that out of the way, continue on to leave and move to the next phase of the story.

Back to Dogtown
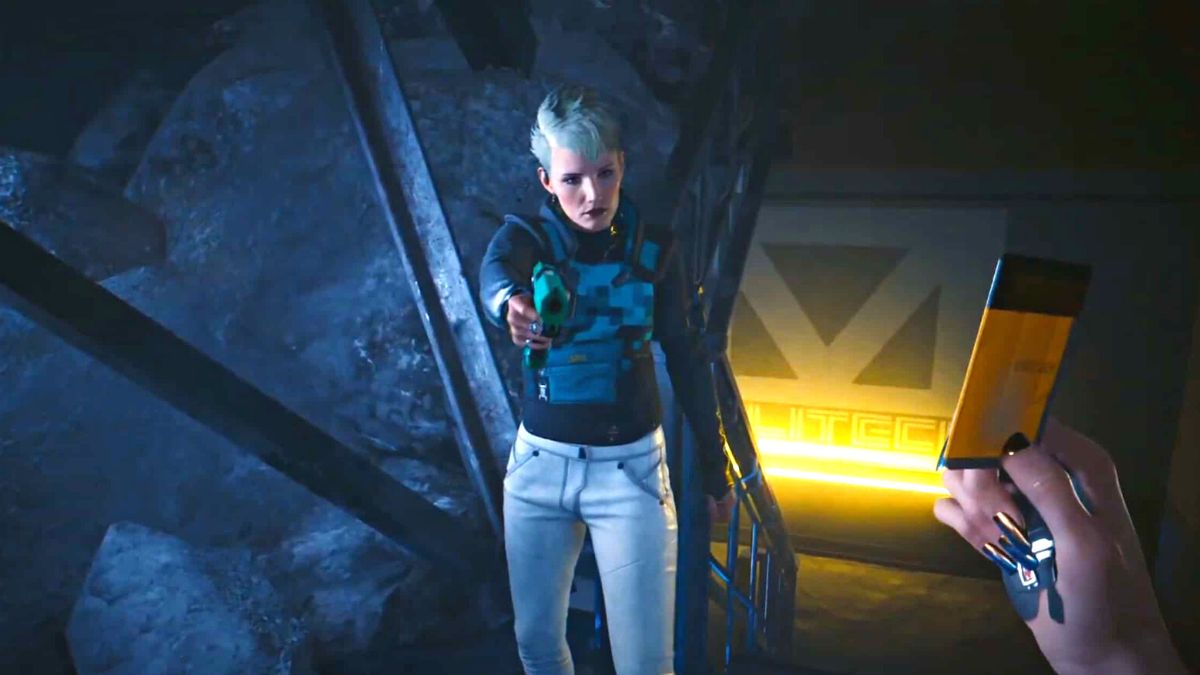
With the Militech card in your possession, head back to Dogtown to meet up with Bree. Either follow the quest marker or fast-travel to Kress Street, whatever your heart tells you. Step into the elevator you come across and sink down to the lowest rungs of Night City. You’ll want to head there at night since Mr. Hands requests that you use the utmost caution when it comes to finding Bree. Once the elevator’s landed at the bottom, use your scanner to highlight a trail of footprints. You could simply spend your time running around this extremely dark area, but it’s much faster to just follow the trail. It’ll take you through a series of broken walls and ventilation shafts before, eventually, Bree gets the jump on you.
Before you can make your way through the second cracked wall, she’ll appear, pointing a gun at V. Show her the Militech card, and she’ll lower her weapon, even though she doesn’t trust you just yet. Give her the access card and follow her down a flight of stairs until you reach a bunker. Bree will unlock the front doors, tasking V with a quick scout of the interior. It’ll all be safe, so continue following her into the facility.
Related: How to Get the Secret Ending in Cyberpunk 2077 Phantom Liberty DLC
Eventually, she’ll open up another door and warn V that they should be cautious of the old security system. Beyond the doorway, there’s a laser mine and two security cameras. Shut them down, but try not to shoot them. If you do, two turrets will drop from the ceiling and immediately engage. If you duck to the left, you’ll have an angle to disengage both mines, which you’ll want to do to clear a path for Bree, who’ll wait for V to clear the next room.
Through the doorway to the right of Bree is a room with more cameras, two more turrets and PLENTY more laser mines. Get rid of them however you want; surprisingly, the turrets aren’t all that dangerous. They shot me up a few times and barely scratched my health. I suppose that is what happens when you let your security systems rot for decades. Once all the threats in the office room have been eliminated, continue into the next room where the camera and turrets have already been disabled. Neat!
Bree will comment that you’ve reached the mainframe, her primary objective. In the chest just opposite the doorway is a legendary piece of clothing that you’ll want to grab before things get hairy. Bree will request that V watch a series of brief videos detailing how some corpos were trying to restart an abandoned project. Watch them all – it’s interesting stuff. Turns out, Militech was trying to use a rogue AI to upgrade some of their old weapons.

Having watched all the videos, Bree’s neighbor will show up, gun in hand. It turns out that his name is Dante, and he’s working for Militech! The conversation will eventually go bad, and Dante will threaten to kill Bree. Your choice is simple: Let him or stop him before he can pull the trigger.
Should You Save Bree or Not in Cyberpunk 2077: Phantom Liberty?
This quest can be resolved in three different ways. The first is siding with Bree and killing Dante, which rewards V with his iconic revolver, Ol’ Reliable. Should you go the other way and let Dante kill Bree or do it yourself, you’ll gain her iconic energy pistol, Riskit, from the storage crates on the right side of the mainframe room. Going with either solution prompts Mr. Hands to contact V and wrap up the quest, earning you 5,000 eddies.
Related: How to Use the Chimera Core in Cyberpunk 2077
The third option is to kill both Bree and Dante so that you get both their weapons, as well as the Database: Cynosure Site D shard. While Mr. Hands is initially angry that both of them died, he’s very forgiving once you tell him you acquired such a valuable shard. You can give it to him via drop-off point, and you’ll still get your 5,000 eddies.
Note that if you do side with Bree, Mr. Hands will call you a day after completing the quest and explain that she sold the data she acquired for her own gain. A team of NetWatch agents will then randomly surprise attack V in the streets of Night City. At this point in the game, they’re not a major threat, but still, you should keep your eyes peeled for them.


Last Updated On: Nov 15, 2023 10:40 am CET